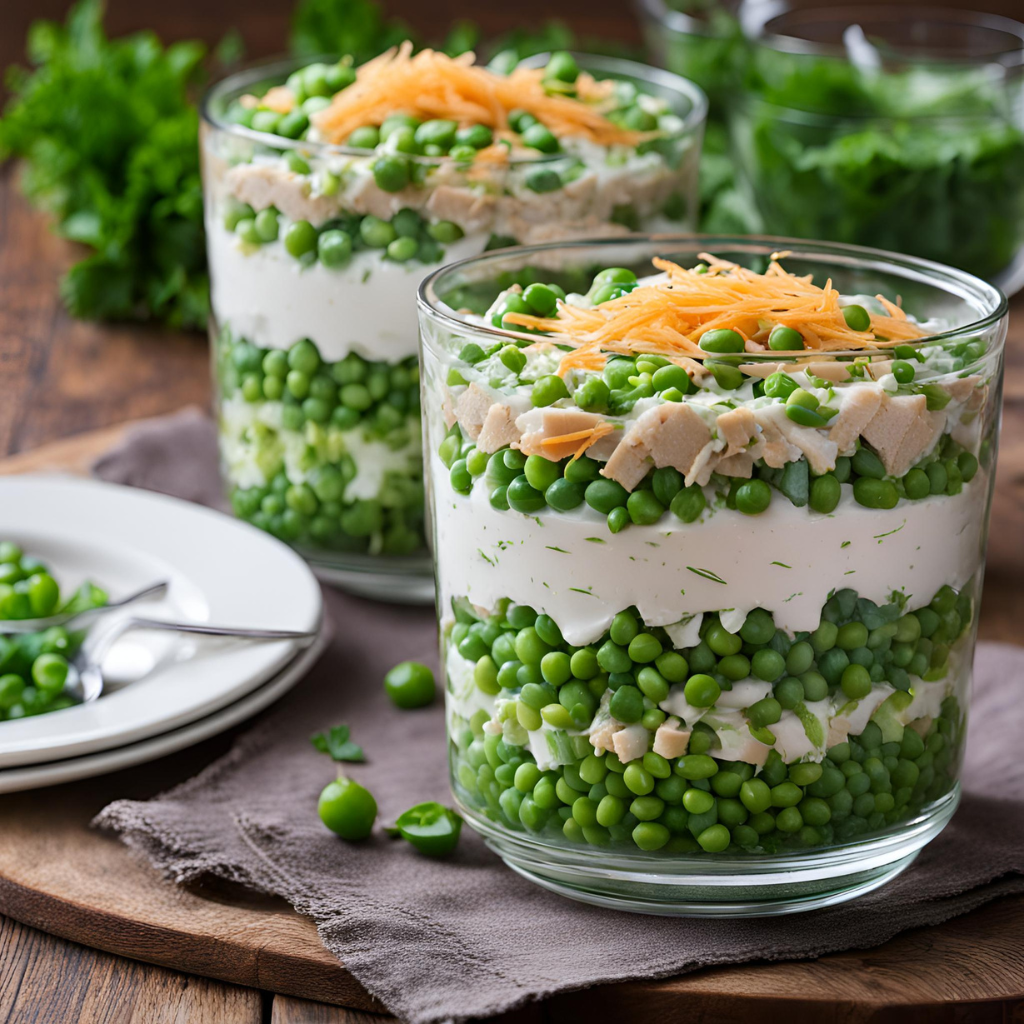
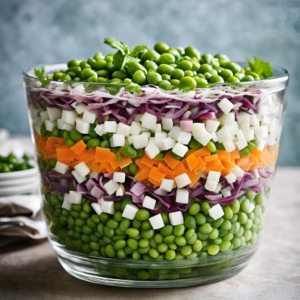
Layered pea salad is one of those classic potluck dishes that quietly disappears before you even notice. It is simple, colorful, and easy to make ahead, which is probably why it shows up at so many family gatherings and summer picnics. I love how it looks in a clear glass dish, with all the layers stacked neatly on top of each other.
The combination of sweet peas, crisp lettuce, cheddar cheese, and bacon bits with a lightly sweet dressing is surprisingly balanced. It may sound straightforward, but the flavors work together in a way that keeps people going back for seconds.
Table of Contents
I first made this layered pea salad for a backyard get-together when I needed something I could prepare in advance. The 8-hour chill time seemed long, but it made a real difference. By the time it was served, the dressing had settled into the peas and everything tasted cohesive.
Since then, it has become one of my favorite make-ahead salads when I am feeding a crowd.
Why You’ll Love This Recipe?
• Feeds a Crowd: Serves up to 20 people comfortably.
• Make-Ahead Friendly: Requires at least 8 hours of chilling.
• Balanced Sweet and Savory: Sugar lightly sweetens the dressing.
• Simple Assembly: Just layer and refrigerate.
• Colorful Presentation: Looks great in a glass dish.
• Crisp and Creamy Texture: Peas and lettuce stay fresh under the topping.
• Customizable: Optional green bell pepper adds extra crunch.
Chef’s Pro Tips for Perfect Results!
• Drain peas thoroughly: Excess liquid can make the salad watery.
• Use crisp iceberg lettuce: It holds up well during chilling.
• Spread layers evenly: This helps every serving look balanced.
• Dissolve sugar fully in dressing: Prevents grainy texture.
• Chill overnight if possible: The flavor improves with time.
Kitchen Tools You’ll Need
- Large salad bowl or 9×13-inch glass baking dish
- Mixing spoon
- Measuring cups and spoons
- Cutting board
- Knife
Ingredients in This Recipe

- 2 cups shredded Cheddar cheese: Adds sharp, savory flavor and richness.
- Bacon bits: Provide smoky crunch and contrast to the creamy dressing.
- 1 cup creamy salad dressing (such as Miracle Whip): Forms the base of the sweet and tangy dressing.
- 2 tablespoons white sugar: Lightly sweetens the dressing.
- 15 oz cans baby peas, drained: Sweet, tender peas that create the main layer.
- ½ cup finely chopped green bell pepper, optional: Adds freshness and crunch.
- 1 head iceberg lettuce, torn into bite-sized pieces: Brings crisp texture and structure to the salad.
Ingredient Substitutions
• Mayonnaise instead of creamy salad dressing: For a less sweet flavor profile.
• Red bell pepper instead of green: Slightly sweeter taste.
• Colby Jack instead of Cheddar: Milder cheese option.
• Turkey bacon bits instead of regular: Lighter alternative.
• Frozen peas instead of canned: Thaw and drain well before using.
Ingredient Spotlight
• Baby Peas: Their natural sweetness balances the savory bacon and sharp cheddar. Be sure they are fully drained to prevent excess moisture.
• Iceberg Lettuce: Known for its crisp texture, it holds its shape even after hours in the refrigerator.
Instructions for Making This Recipe
- Combine the salad dressing and sugar in a large salad bowl or a 9×13-inch glass baking dish, stirring until the sugar dissolves completely.
- Gently mix in the peas and chopped green pepper, ensuring they are evenly distributed.
- Spread this pea mixture evenly across the bottom of the dish.
- Next, layer the lettuce over the pea mixture, spreading it out evenly.
- Follow with a layer of cheese sprinkled over the lettuce.
- Finally, top the cheese with a generous sprinkle of bacon bits.
- Cover the dish and refrigerate for at least 8 hours or overnight to allow the flavors to meld together.
Layered Pea Salad
Ingredients
- 2 cups Shredded Cheddar cheese
- Bacon bits
- 1 cup Creamy salad dressing (such as Miracle Whip)
- 2 tbsp White sugar
- 15 oz Cans baby peas, drained
- ½ cup Finely chopped green bell pepper (Optional)
- 1 Head iceberg lettuce, torn into bite-sized pieces
Instructions
- Combine the salad dressing and sugar in a large salad bowl or a 9×13-inch glass baking dish, stirring until the sugar dissolves completely.
- Gently mix in the peas and chopped green pepper, ensuring they are evenly distributed.
- Spread this pea mixture evenly across the bottom of the dish.
- Next, layer the lettuce over the pea mixture, spreading it out evenly.
- Follow with a layer of cheese sprinkled over the lettuce.
- Finally, top the cheese with a generous sprinkle of bacon bits.
- Cover the dish and refrigerate for at least 8 hours or overnight to allow the flavors to meld together.
Nutrition Facts:
| Nutrition | Value |
|---|---|
| Calories | 150 kcal |
| Carbohydrates | 14 g |
| Protein | 7 g |
| Vitamin C | 11 mg |
| Iron | 1 mg |
| Sugar | 7 g |
| Calcium | 102 mg |
Texture & Flavor Secrets
The layering method keeps the lettuce crisp while the peas absorb the sweetened dressing. The cheese and bacon on top add richness and crunch, creating a balanced bite every time.
Cooking Tips & Tricks!
- Press layers lightly to keep them compact but not compressed.
- Serve with a large spoon to scoop through all layers evenly.
What to Avoid?
• Skipping the draining step for peas.
• Stirring the salad after layering, which removes the layered effect.
• Using soft lettuce varieties that wilt easily.
• Reducing chill time significantly.
Make-Ahead and Storage Tips!
• Refrigerate covered for at least 8 hours before serving.
• Store leftovers tightly covered in the refrigerator for up to 2 days.
• Best enjoyed fresh within the first 24 hours for optimal texture.
How to Serve This Dish?
Creative Leftover Transformations!
• Spoon into wraps for a quick lunch.
• Add extra lettuce and toss lightly for a mixed salad version.
• Serve on top of baked potatoes.
• Mix into cooked pasta for a quick pasta salad twist.
Additional Tips!
• Chop vegetables finely for even layering.
• Adjust sugar slightly if you prefer less sweetness.
• Keep refrigerated until ready to serve.
• Use freshly shredded cheese for best texture.
Make It a Showstopper!
Serve the salad in a clear glass dish so the vibrant green peas, crisp lettuce, bright cheddar, and golden bacon bits are visible. Just before serving, sprinkle a little extra shredded cheese and bacon on top for a polished finish.
Variations to Try!
• Creamier Version: Add an extra ¼ cup salad dressing.
• Extra Crunch: Add chopped celery between layers.
• Spicy Kick: Sprinkle a pinch of cayenne into the dressing.
• Protein Boost: Add diced hard-boiled eggs as a layer.
• Low Sugar Option: Reduce sugar to 1 tablespoon for a milder sweetness.
FAQ’s
- Can I use frozen peas instead of canned?
Yes, thaw and drain them thoroughly before layering. - Do I have to use Miracle Whip?
No, mayonnaise works as a substitute. - Why does it need to chill for 8 hours?
Chilling allows the flavors to meld and settle properly. - Can I make it the night before?
Yes, overnight chilling works perfectly. - How long does it last in the fridge?
Up to 2 days, though best within 24 hours. - Can I mix it instead of layering?
You can, but the layered presentation is traditional. - Is the green bell pepper necessary?
No, it is optional. - Can I reduce the cheese?
Yes, adjust to your preference. - What dish size works best?
A 9×13-inch glass baking dish works well. - Can I double the recipe?
Yes, use a larger dish and adjust layering accordingly.
hi there,
i’m Archie
A San Diego-born home cook who turns her kitchen into a playground of flavors.