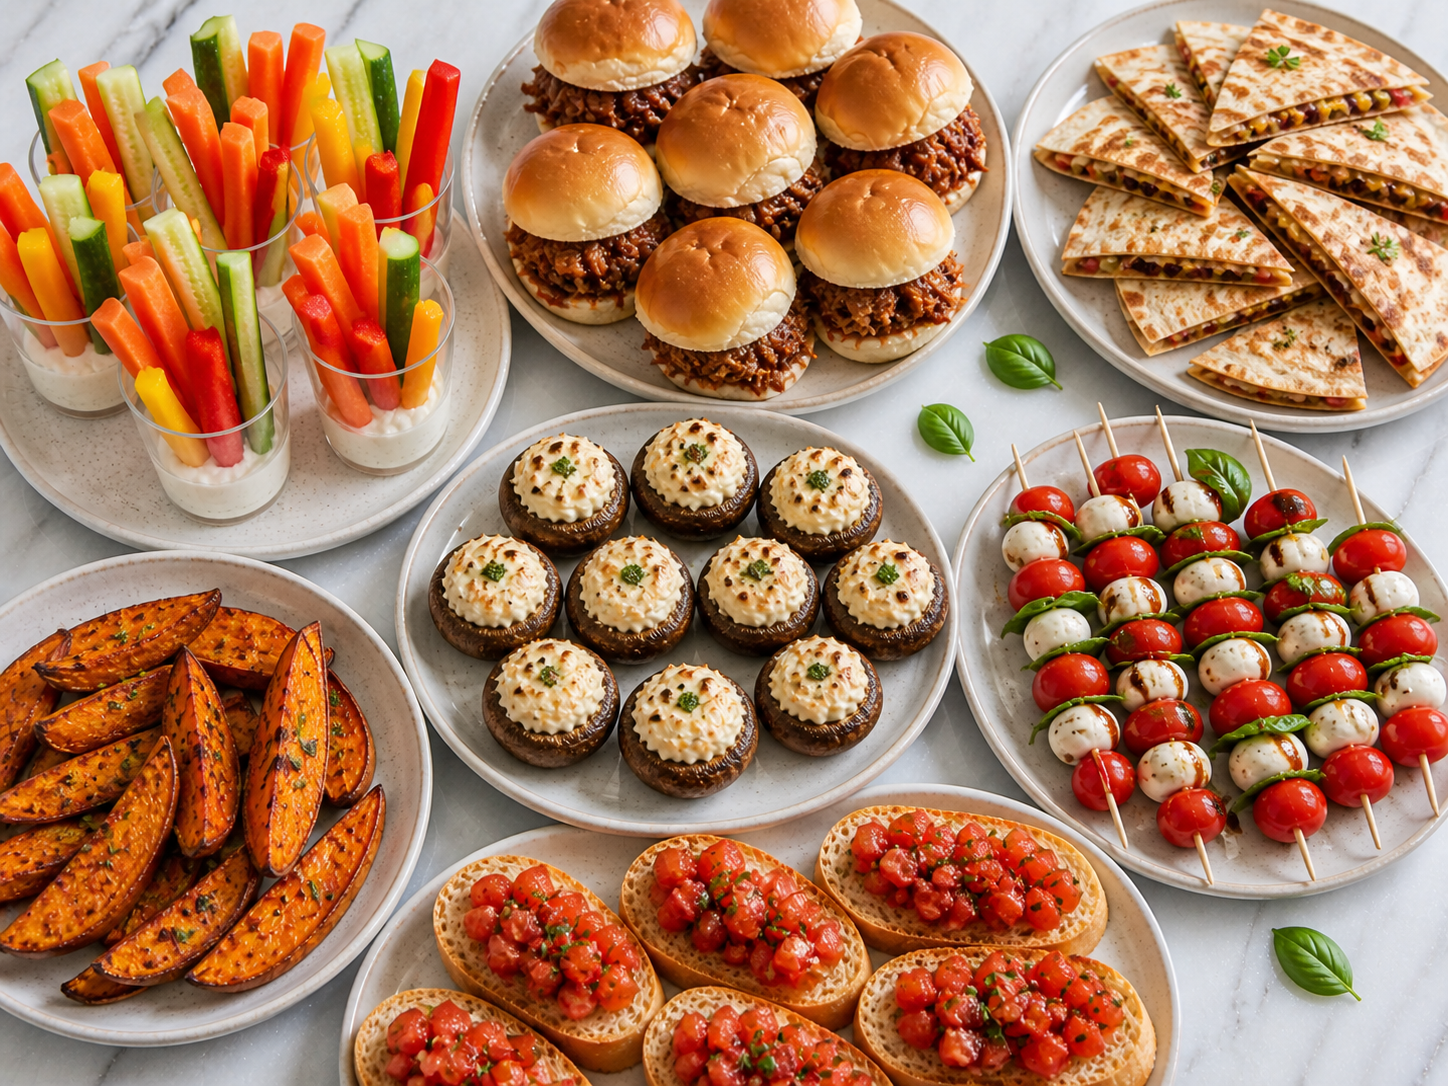
The 4th of July is all about celebrating with great food, good company, and bold flavors that match the spirit of summer. Appetizers set the tone for your holiday spread they should be fun, flavorful, and easy to make so you can enjoy the day just as much as your guests.
From fresh, light bites to crowd‑favorite finger foods, these easy starters bring a festive feel without hours of prep. Many feature vibrant colors or simple patriotic twists that feel right at home on any Independence Day table.
Drawing inspiration from trending summer and holiday menus, this list mixes classic favorites with fresh, vibrant ideas that are perfect for cooling off and snacking before the main event.
1. Veggie Cups
These veggie cups are a fresh, colorful snack that’s perfect for parties, lunches, or healthy snacking anytime. Crisp vegetables stand upright in little cups with a creamy seasoned dip at the bottom.
The crunch of celery, bell peppers, cucumbers, carrots, and snap peas pairs beautifully with juicy grape tomatoes. A simple sour cream and mayonnaise dip brings smooth richness with a lightly herby flavor.
Easy to assemble and even easier to eat, these cups are fun for gatherings or quick snacks while keeping things bright and wholesome.
Servings: 3–4 servings
Ingredients
For the Dip:
- Sour cream
- Mayonnaise
- Dried onion
- Bon Appétit or Beau Monde seasoning
- Dill weed
For the Veggies & Cups:
- Snap peas
- Bell peppers (sliced)
- Celery (sticks)
- Cucumber (sticks)
- Carrots (sticks)
- Grape tomatoes
- 3.5 oz appetizer cups
Instructions
- In a small bowl, combine sour cream and mayonnaise.
- Add dried onion, Bon Appétit (or Beau Monde) seasoning, and dill weed. Stir until smooth and well blended.
- Spoon a couple of tablespoons of the dip into the bottom of each appetizer cup.
- Prepare the vegetables by washing and cutting them into sticks as needed snap peas remain whole.
- Arrange the celery, bell pepper, cucumber, carrots, snap peas, and grape tomatoes upright in each cup, spreading them evenly.
- Make sure each cup has a good mix of colors and textures.
- Serve immediately or chill the cups briefly before serving for a cool, refreshing snack.
2. BBQ Chicken Sliders
These BBQ chicken sliders are a tasty, handheld meal that works well for game days, casual dinners, or gatherings. Tender chicken is coated in sweet and tangy barbecue sauce and served on soft Hawaiian rolls.
The chicken stays juicy and flavorful with a mix of simple seasonings, while the buttery, brown sugar‑topped buns add a touch of sweetness. A fresh slaw brings crisp texture and a bright kick that balances the richness.
Perfect for sharing, these sliders combine classic BBQ flavors with a fun slider twist that everyone can enjoy.
Servings: 3–4 servings
Ingredients
For the Chicken & Sliders:
- 1 pound chicken breasts, skinless and boneless
- 2 tablespoons olive oil, divided
- ½ sweet onion, sliced
- ½ teaspoon salt
- ¼ teaspoon ground black pepper
- ¼ teaspoon chili powder
- 1 cup Sweet Baby Ray’s Original BBQ sauce
- 12 Hawaiian sweet rolls
For the Butter Topping:
- 2 tablespoons melted butter
- 2 teaspoons light brown sugar
- ½ teaspoon Italian seasoning
For the Slaw:
- 2½ cups coleslaw mix (or shredded cabbage)
- Handful fresh cilantro, chopped
- 3 tablespoons mayonnaise
- 1 tablespoon fresh lime juice
- Salt and pepper
Instructions
- Heat 1 tablespoon of olive oil in a skillet over medium heat. Add the sliced sweet onion and cook until softened.
- Season the chicken breasts with salt, black pepper, and chili powder.
- Add the remaining tablespoon of olive oil to the skillet, then add the seasoned chicken. Cook until browned and cooked through.
- Pour the BBQ sauce over the chicken and stir to coat evenly. Reduce heat and let simmer for a few minutes. Remove from heat.
- Once slightly cooled, shred the chicken with two forks in the skillet or on a cutting board. Mix the shredded chicken with the sauce.
- In a small bowl, combine the melted butter, light brown sugar, and Italian seasoning. Brush this mixture over the cut tops of the Hawaiian sweet rolls.
- Place the buttered rolls under a broiler or in a warm oven briefly until the topping is lightly toasted and bubbly.
- In a separate bowl, combine the coleslaw mix, chopped cilantro, mayonnaise, lime juice, and a pinch of salt and pepper. Toss until well coated.
- To assemble, layer the bottom halves of the Hawaiian rolls with BBQ chicken, then add some slaw on top.
- Place the tops of the rolls on the sliders and serve.
3. Mini Veggie Quesadillas
These mini veggie quesadillas are quick, tasty, and perfect for snack time or a light meal. Packed with colorful veggies and melted cheese, they offer a satisfying bite in a smaller, more manageable size.
The crispy tortillas hold a savory filling of sautéed vegetables and gooey cheese, making each bite flavorful and comforting. Paired with fresh salsa, they’re a perfect combination of crunch, creaminess, and spice.
Perfect for lunch, dinner, or sharing at parties, these mini quesadillas are always a hit!
Servings: 3–4 servings
Ingredients
- 4 small flour tortillas
- 1 cup shredded cheese (cheddar, mozzarella, or a blend)
- ½ red bell pepper, diced
- ½ green bell pepper, diced
- ½ cup corn kernels (fresh or frozen)
- ¼ cup red onion, diced
- 1 tablespoon olive oil
- Salt and pepper to taste
- Fresh salsa, for serving
- Fresh cilantro, chopped (optional)
Instructions
- Heat olive oil in a skillet over medium heat. Add the diced red and green bell peppers, red onion, and corn. Sauté for 3–4 minutes until the veggies are tender. Season with salt and pepper.
- Place one tortilla in the skillet over medium heat. Sprinkle a portion of the shredded cheese over the tortilla, followed by a generous amount of sautéed vegetables.
- Top with a second tortilla and press lightly. Cook for 2–3 minutes on each side until the tortillas are golden brown and the cheese is melted.
- Remove from heat and cut into smaller wedges for easy serving.
- Serve with a side of fresh salsa and chopped cilantro for added flavor.
4. Roasted Sweet Potato Wedges
These roasted sweet potato wedges make a perfect appetizer for any gathering, offering a crispy and tender bite full of flavor. With a blend of savory seasonings like smoked paprika, chili powder, and cumin, each wedge is a warm, spiced treat.
Paired with a creamy avocado‑yogurt dip, the wedges become even more irresistible. The contrast of spicy and creamy makes every bite feel balanced and satisfying, all in one simple, finger‑food form.
Whether for a party or as a snack, these sweet potato wedges will definitely impress your guests.
Servings: 3–4 servings
Ingredients
For the Wedges:
- Sweet potatoes, scrubbed and cut into wedges
- Avocado oil
- Smoked paprika
- Chili powder
- Cumin
- Salt (kosher)
- Black pepper (freshly cracked)
For the Sauce:
- Avocado, fresh and ripe
- Fresh garlic
- Dijon mustard
- Lemon juice (fresh)
- Plain Greek yogurt
Instructions
- Preheat the oven to 425°F (220°C).
- In a large bowl, toss the sweet potato wedges with avocado oil until evenly coated.
- Sprinkle smoked paprika, chili powder, cumin, salt, and freshly cracked black pepper over the wedges. Toss again so the seasonings stick well.
- Spread the seasoned sweet potato wedges in a single layer on a baking sheet.
- Roast in the preheated oven for 25–30 minutes, flipping once halfway through, until crispy at the edges and tender inside.
- While the wedges roast, prepare the sauce: In a bowl, mash the ripe avocado until smooth.
- Add the minced fresh garlic, Dijon mustard, fresh lemon juice, and plain Greek yogurt. Stir until creamy and well combined.
- Taste and adjust seasoning if needed.
- Serve the roasted sweet potato wedges warm with the avocado‑yogurt sauce on the side for dipping.
5. Stuffed Mushrooms with Cream Cheese
These stuffed mushrooms with cream cheese are the perfect bite-sized appetizer for any occasion! The combination of creamy cream cheese and lump crab meat inside tender mushroom caps makes each bite a burst of flavor.
Seasoned with fresh herbs, garlic, and a hint of Parmesan, these mushrooms are topped with crispy panko breadcrumbs for the perfect contrast. They’re a delicious, elegant way to impress guests or treat yourself to a savory snack.
Simple to make and even easier to enjoy, these stuffed mushrooms are sure to be a hit at your next gathering.
Servings: 3–4 servings
Ingredients
- 20 large fresh mushrooms
- 4 oz cream cheese, softened
- ¼ cup mayonnaise
- 6 oz lump crab meat (canned)
- 2 green onions, thinly sliced
- 1 Tbsp parsley, chopped
- 2 garlic cloves, pressed
- ¼ tsp salt
- 1⁄8 tsp black pepper
- ⅓ cup Parmesan cheese, grated
- ⅓ cup panko bread crumbs
- 2 tablespoons unsalted butter, melted
Instructions
- Preheat the oven to 375°F (190°C).
- Clean the mushrooms and gently remove the stems. Set the caps aside and finely chop the stems.
- In a bowl, combine the softened cream cheese and mayonnaise until smooth.
- Add the lump crab meat, chopped mushroom stems, thinly sliced green onions, parsley, pressed garlic, salt, and black pepper. Mix until well combined.
- Stir in the grated Parmesan cheese and panko bread crumbs.
- Spoon the filling evenly into each mushroom cap, pressing lightly so it holds.
- Place the stuffed mushrooms on a baking sheet.
- Drizzle the melted butter over the filled mushrooms.
- Bake for 18–22 minutes, until the tops are golden and the mushrooms are tender.
- Remove from the oven and let cool slightly before serving.
6. Caprese Skewers
If you’re looking for a light, refreshing appetizer, these Caprese skewers are just the thing! They’re packed with vibrant colors and fresh ingredients, bringing a touch of Italy to your table in a bite-sized form.
The juicy sweetness of cherry tomatoes complements the creamy mozzarella, while the fresh basil adds a burst of flavor. Drizzling with olive oil and balsamic glaze takes this dish to the next level, creating a perfect balance of tangy and rich.
These skewers are as delightful to look at as they are to eat, making them the perfect addition to any gathering.
Servings: 3–4 servings
Ingredients
- 20 cherry or grape tomatoes
- 20 fresh mozzarella balls (bocconcini or ciliegine)
- 20 fresh basil leaves
- Balsamic glaze, for drizzling (optional)
Instructions
7. Tomato Basil Bruschetta
Bruschetta is a functional choice for a light appetizer or a fresh summer snack. This preparation uses ripe tomatoes to create a topping that sits atop toasted artisanal bread.
The flavor relies on the combination of aromatic basil and the natural acidity of heirloom tomatoes. A light touch of lemon zest and balsamic vinegar provides a balanced, savory finish.
Servings: 4
Ingredients
- 700g heirloom tomatoes, diced
- 1 shallot, finely diced
- 2 garlic cloves (1 minced, 1 halved)
- 1 bunch fresh basil, torn
- 5 tbsp extra-virgin olive oil (divided)
- 500g sourdough, ciabatta, or baguette, sliced
- Fine sea salt to taste
- Freshly cracked black pepper to taste
- Balsamic vinegar, for garnish
- Lemon zest, for garnish
Instructions
- Combine the diced heirloom tomatoes, finely diced shallot, minced garlic, and torn basil in a medium mixing bowl.
- Stir in 2 tablespoons of extra-virgin olive oil, sea salt, and black pepper, then let the mixture sit for 10 minutes.
- Preheat a grill pan or oven to medium-high heat and arrange the bread slices in a single layer.
- Brush both sides of the bread slices with the remaining 3 tablespoons of olive oil.
- Toast the bread for 2 to 3 minutes per side until the edges are golden and crisp.
- Remove the bread from the heat and immediately rub the cut side of the halved garlic clove over the surface of each slice.
- Spoon a generous amount of the tomato mixture onto each piece of toasted bread.
- Finish each slice with a few drops of balsamic vinegar and a light pinch of lemon zest before serving.

hi there,
i’m Noah
A California-born food blogger behind Freshman Cook, whose culinary journey began in his tiny apartment kitchen.