Summer heat calls for treats that are easy to make and refreshingly cool. When you don’t want to turn on the oven but still crave something sweet, no-bake desserts are the perfect solution.
These simple, no-fuss recipes are not only light and refreshing but also a great way to enjoy summer flavors like berries, citrus, and cream without the extra hassle of baking. Plus, they’re perfect for hot days when you don’t want to spend too much time in the kitchen.
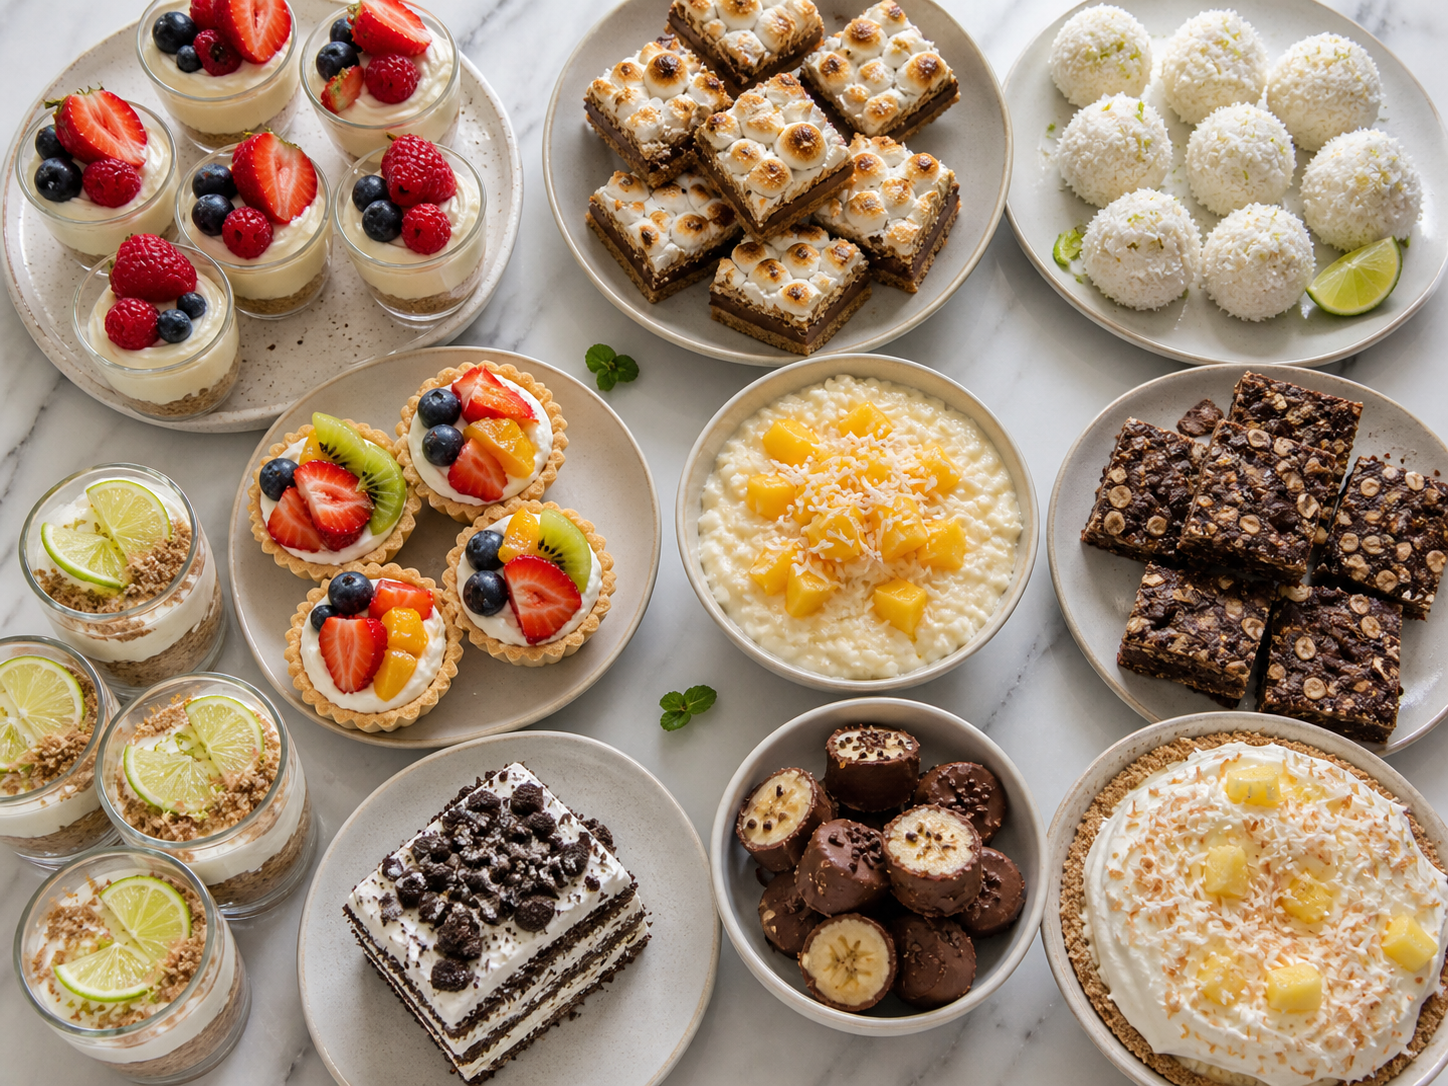
From creamy cheesecakes to fruit-filled parfaits, these 10 no-bake desserts will keep you cool, satisfied, and ready to enjoy every moment of summer.
1. No-Bake Cheesecake Cups
These are simple no-bake cheesecake cups with a nutty base and a creamy topping. They’re great for quick desserts, snacks, or casual gatherings.
The pecan crust adds a crunchy texture, while the creamy cheesecake filling is smooth and rich with a light lemon tang. Honey naturally sweetens the layers without being too heavy.
They come together without oven time, making them ideal when ease and flavor are both important. Each bite delivers a balance of crunchy and velvety textures.
Servings: 3 servings
Ingredients
- 1 cup pecans
- 2 tablespoons butter, melted
- 1 tablespoon honey
- 16 ounces cream cheese, softened
- ¼ cup heavy cream
- ¼ cup honey
- 1 tablespoon lemon juice
Instructions
- Place the pecans in a food processor and pulse until finely ground.
- Add melted butter and 1 tablespoon honey to the pecans. Pulse until the mixture comes together.
- Press the pecan mixture evenly into the bottom of small serving cups to form the crust.
- In a medium bowl, beat the softened cream cheese until smooth.
- Add heavy cream, ¼ cup honey, and lemon juice to the cream cheese. Mix until well combined and creamy.
- Spoon the cheesecake filling over the pecan crust in each cup.
- Chill the cups in the refrigerator for at least 1–2 hours before serving to set.
- Serve chilled and enjoy.
2. No-Bake S’Mores Bars
Craving a sweet treat without the hassle of baking? These No-Bake S’Mores Bars are the perfect solution! With a buttery, graham cracker base topped with gooey chocolate and mini marshmallows, every bite is pure nostalgia.
They’re the ultimate quick dessert no oven required! The combination of crunchy, creamy, and melty makes these bars irresistibly delicious. Plus, they come together in just a few easy steps.
Whether for a last-minute snack or a fun dessert to share, these bars will hit the spot every time.
Servings: 3–4 servings
Ingredients
- 8 tablespoons (1 stick) unsalted butter, softened
- 1 cup packed light brown sugar
- 1 teaspoon pure vanilla extract
- 2 cups graham cracker crumbs
- 1 cup whole wheat flour (or all‑purpose flour)
- 1 teaspoon flaky sea salt (or ½ teaspoon kosher salt)
- 1 (14‑ounce) can sweetened condensed milk
- 1½ cups chocolate chips
- 1½ cups mini marshmallows
Instructions
- In a large bowl, combine the softened butter, packed light brown sugar, and pure vanilla extract. Mix until smooth and slightly creamy.
- Add the graham cracker crumbs, whole wheat flour (or all‑purpose flour), and sea salt. Stir until well combined and sticky.
- Press the mixture evenly into the bottom of a lined or greased square pan to form the base layer.
- Pour the sweetened condensed milk evenly over the crust, spreading gently if needed.
- Sprinkle the chocolate chips evenly over the sweetened condensed milk layer.
- Scatter the mini marshmallows on top of the chocolate chips.
- Press down lightly so the toppings stick and create a compact layer.
- Refrigerate for at least 2–3 hours until firm and set.
- Once set, cut into bars and serve chilled or at room temperature.
3. Coconut Lime Snowballs
These coconut lime snowballs are light, creamy bites with a tropical twist. They make a refreshing dessert, snack, or sweet treat alongside afternoon tea or coffee.
The texture is soft and fluffy from the cream cheese base, with sweet coconut adding a tender chew. A hint of citrus brightens every bite without being overpowering.
Rolled in extra coconut, they look as delightful as they taste and bring a simple, summery flavor without any baking required.
Servings: 3–4 servings
Ingredients
- 8 oz cream cheese, softened
- 1/2 cup confectioners’ sugar
- 1 tsp vanilla extract
- 2 cups sweetened shredded coconut (reserve 1/2 cup for rolling)
- 1/4 cup unsalted butter, melted
- 1 pinch salt
Instructions
- In a mixing bowl, beat the softened cream cheese until smooth.
- Add the confectioners’ sugar, vanilla extract, and a pinch of salt. Mix until well combined.
- Stir in the melted butter until fully incorporated.
- Add 2 cups sweetened shredded coconut and mix until a sticky dough forms.
- Scoop small portions of the mixture and roll them into bite‑sized balls with your hands.
- Spread the reserved 1/2 cup shredded coconut on a plate and roll each ball in the coconut until fully coated.
- Place the coated snowballs on a tray or plate and chill in the refrigerator for at least 30 minutes before serving.
- Serve chilled and enjoy.
4. No Bake Mascarpone Fruit Tarts
Looking for a refreshing dessert that’s easy to make and perfect for any occasion? These No-Bake Mascarpone Fruit Tarts are the answer! With a buttery graham cracker crust and a smooth, creamy mascarpone filling, they’re both indulgent and light.
Topped with a colorful medley of fresh mixed berries, each bite offers the perfect balance of sweetness and tang. Plus, they come together quickly without the need for baking, making them ideal for busy days or last-minute treats.
These tarts are as delicious as they are pretty, bringing a touch of elegance to any meal.
Servings: 3–4 servings
Ingredients
- 1½ cups crushed graham crackers
- 6 tablespoons unsalted butter, melted
- 1 tablespoon sugar
- ¾ cup heavy cream, chilled
- 1 cup mascarpone cheese
- 3 tablespoons sugar
- 1 teaspoon vanilla extract
- Mixed berries for topping the fruit tarts
Instructions
- In a bowl, combine the crushed graham crackers, melted butter, and 1 tablespoon sugar. Mix until the crumbs are evenly moistened.
- Press the graham cracker mixture firmly into the bottoms of small tart pans or serving glasses to form the crust.
- In a separate bowl, pour the chilled heavy cream and whip until soft peaks form.
- Add the mascarpone cheese, 3 tablespoons sugar, and vanilla extract to the whipped cream. Gently fold together until smooth and creamy.
- Spoon the mascarpone cream filling evenly over the prepared graham cracker crusts.
- Arrange the mixed berries on top of each tart, pressing them lightly into the filling.
- Refrigerate the tarts for at least 1–2 hours to set before serving.
- Serve chilled and enjoy.
5. Mango Coconut Rice Pudding
This mango coconut rice pudding is a creamy, tropical dessert that’s great after dinner or as a sweet snack. It combines the smooth richness of coconut with the natural sweetness of ripe mango.
The sticky rice and tapioca pearls give the pudding a soft, silky texture with gentle chewiness. Coconut milk and coconut water create a fragrant, velvety base.
Fresh mango pieces add bright flavor and juicy contrast, making this dessert feel both refreshing and satisfying without being heavy.
Servings: 3–4 servings
Ingredients
- ¼ cup sticky rice
- 2 tablespoons tapioca pearls
- 5 tablespoons granulated white sugar
- 1¼ cup coconut milk
- 1 cup coconut water (or water)
- 2 ripe mango
Instructions
- Rinse the sticky rice under cold water until the water runs clear. Drain well.
- In a medium saucepan, combine the sticky rice and tapioca pearls with the coconut milk and coconut water (or water). Stir to mix.
- Place the pan over medium heat and bring to a gentle simmer, stirring occasionally.
- Add the granulated white sugar and continue to cook, stirring frequently to prevent sticking.
- Reduce the heat to low and cook until the rice and tapioca are tender and the mixture thickens to a pudding‑like consistency (about 15–20 minutes).
- Peel and dice the ripe mangoes into small pieces.
- Once the pudding has thickened, remove from heat and let cool slightly.
- Spoon the pudding into serving bowls. Top with the diced mango pieces.
- Serve warm or chilled, according to preference.
6. No Bake Chocolate Oat Bars
These no bake chocolate oat bars are a simple, sweet treat that’s great for dessert, snacks, or lunchbox goodies. They combine wholesome oats with rich chocolate and peanut butter for a satisfying texture.
The bars are chewy and slightly crunchy, with a smooth chocolate layer on top. The peanut butter adds depth and a hint of savory balance.
Without any oven time, they come together quickly perfect for busy days or when a no‑fuss dessert is wanted.
Servings: 3–4 servings
Ingredients
- ½ cup creamy peanut butter
- 3 cups quick cooking oats
- ½ cup packed brown sugar
- 1 cup semisweet chocolate chips
- 1 cup unsalted butter
- 1 tsp vanilla extract
Instructions
- In a medium saucepan over low heat, melt the unsalted butter.
- Remove the saucepan from heat. Add the quick cooking oats and stir until the oats are fully coated in the mixture.
- In a microwave‑safe bowl, melt the semisweet chocolate chips in 20‑second intervals, stirring between each, until smooth.
- Crumble the remaining oat mixture over the top of the chocolate layer, pressing lightly so it sticks.
- Once set, cut into bars and serve.
7. Key Lime Pie Parfaits
These key lime pie parfaits are a bright, creamy dessert that’s both refreshing and simple to make. They work well after dinner, for parties, or anytime a tart, sweet treat is desired.
Topped with lime zest or slices, these parfaits look as delightful as they taste perfect for summer or anytime a burst of lime flavor is wanted.
Ingredients
Instructions
- In a bowl, combine the graham cracker crumbs and shortbread cookie crumbs. Mix evenly.
- Divide the crumb mixture among serving glasses or parfait cups, pressing lightly to form the base layer.
- In a mixing bowl, whisk together the sweetened condensed milk and key lime juice until smooth and thickened.
- In a separate chilled bowl, beat the heavy whipping cream, confectioners’ sugar, and vanilla extract until stiff peaks form.
- Gently fold the whipped cream into the lime mixture until well combined and creamy.
- Spoon or pipe the lime cream over the crumb layers in each glass.
- Add another layer of crumbs if desired, followed by more lime cream.
- Garnish each parfait with freshly grated lime zest or thin lime slices.
- Chill in the refrigerator for at least 1 hour before serving to set.
8. No-Bake Oreo Icebox Cake
This no‑bake Oreo icebox cake is a cool, creamy dessert that’s perfect for warm days or casual get‑togethers. Layers of whipped cream and classic Oreo cookies create a satisfying texture and sweet flavor.
The cookies soften as they chill, so each bite becomes soft and cake‑like with a smooth, fluffy cream. The balance of rich cream and crunchy chocolate cookies keeps every spoonful fun.
Easy to prepare and no oven‑baking needed, this dessert is ideal when a simple but impressive treat is wanted.
Servings: 3–4 servings
Ingredients
- 50 Oreo cookies (regular, not double‑stuffed), plus more for topping
- 3 cups (710 ml) heavy whipping cream, cold
- ¾ cup (90 g) powdered sugar
- 1 tsp (5 ml) vanilla extract (optional)
Instructions
- In a large chilled bowl, pour in the cold heavy whipping cream.
- Add the powdered sugar and vanilla extract (if using) to the cream.
- Using a hand mixer or stand mixer, whip the cream on medium‑high until stiff peaks form.
- On a clean surface, lay out about half of the Oreo cookies in a single layer.
- Spread a generous layer of whipped cream over the cookies.
- Add another layer of Oreos on top of the cream, followed by more whipped cream. Continue layering until all cookies are used, ending with a whipped cream layer.
- Spread the remaining whipped cream evenly on the top and sides.
- Crush a few extra Oreo cookies and sprinkle them on top for garnish.
- Cover and refrigerate for at least 4 hours or overnight so the cookies soften and the cake sets.
- Slice or scoop to serve chilled.
9. Frozen Chocolate Banana Bites
These frozen chocolate banana bites are a simple, refreshing snack that’s perfect for warm days or anytime a cool treat is wanted. They pair ripe banana sweetness with smooth chocolate for a satisfying flavor.
The bananas stay soft and creamy inside, while the chocolate shell adds a firm, rich contrast. Optional nuts or peanut butter bring extra texture and taste.
Easy to make and great straight from the freezer, these bites are ideal for dessert, snack time, or a healthier sweet fix.
Servings: 3–4 servings
Ingredients
- 2 large ripe bananas
- ½ cup chocolate chips (dark or milk)
- 1 tablespoon coconut oil
- 1 tablespoon peanut butter (optional)
- ¼ cup chopped nuts (optional)
Instructions
- Slice the ripe bananas into ½‑inch thick rounds and place them on a parchment‑lined tray.
- Freeze the banana slices for about 30 minutes until firm.
- In a microwave‑safe bowl, combine the chocolate chips and coconut oil. Microwave in 20‑second intervals, stirring between each, until smooth.
- If using peanut butter, stir it into the melted chocolate until fully combined.
- Dip each frozen banana slice into the chocolate mixture, coating the top and sides.
- Place the chocolate‑covered bananas back on the parchment‑lined tray.
- Sprinkle chopped nuts on top of each banana bite if desired.
- Freeze for at least 1 hour until the chocolate is set.
- Serve chilled straight from the freezer.
10. Pineapple Coconut Cream Pie
This pineapple coconut cream pie is a tropical dessert that’s creamy, rich, and refreshing. It works beautifully as an after‑dinner treat or anytime a sweet, fruity pie is wanted.
The filling combines smooth coconut milk and tangy pineapple with a velvety texture from egg yolks and cream cheese. Whipped cream lightens the mixture, while toasted coconut adds a crunchy finish.
All of this sits in a prebaked pie crust for effortless preparation that still feels special and satisfying.
Servings: 3–4 servings
Ingredients
- 1 cup pineapple
- 2 egg yolks (large)
- 2 cups coconut milk
- 2 tbsp cornstarch
- 1/3 cup granulated sugar
- 3 tsp powdered sugar
- 1 pinch salt
- 2 tsp vanilla extract
- 4 oz cream cheese
- 1 cup heavy whipping cream
- 1 cup toasted coconut flakes
- 1 fully baked 9‑inch pie crust (or shortcrust pastry shell)
Instructions
- In a medium saucepan, whisk together the egg yolks, granulated sugar, cornstarch, and pinch of salt until smooth.
- Gradually whisk in the coconut milk and place the saucepan over medium heat. Cook, stirring constantly, until the mixture thickens and comes to a gentle boil.
- Once thickened, remove the pan from heat and stir in the vanilla extract.
- In a separate bowl, beat the cream cheese until smooth.
- Slowly add the warm coconut mixture to the cream cheese, mixing until fully combined and creamy.
- Let the filling cool slightly before folding in the pineapple pieces.
- Pour the coconut‑pineapple filling into the fully baked 9‑inch pie crust and smooth the top.
- In a chilled bowl, whip the heavy whipping cream with powdered sugar until stiff peaks form.
- Spread the whipped cream over the pie filling.
- Sprinkle the toasted coconut flakes evenly over the whipped cream.
- Chill the pie in the refrigerator for at least 2 hours before serving to set.

hi there,
i’m Noah
A California-born food blogger behind Freshman Cook, whose culinary journey began in his tiny apartment kitchen.